Setting up a custom domain on your Systeme.io account is a simple yet effective way to elevate your online presence.
A custom domain not only makes your website look more professional and credible but also helps build trust with visitors and potential customers.
Whether you’re a beginner or an experienced user, this guide will walk you through the process step-by-step, ensuring that you can integrate your domain with ease.
By the end of this article, you’ll know exactly how to connect your root domain to Systeme.io, from configuring your DNS settings to verifying your domain within the platform.
Don’t worry if this sounds technical—each step is explained in detail to remove any guesswork.
If you’re a visual learner, we’ve got you covered!
Check out this step-by-step video tutorial,
Which allows you to follow along as you set up your domain. For even more support, the FunnelAnalysts YouTube channel offers a wealth of helpful video guides on topics like funnels, domains, and growing your online business.
Taking the time to set up a custom domain is a great investment in your brand’s professionalism and online credibility. Let’s get started!
What You Need Before Starting
To begin, ensure you have these ready:
- A domain name – This should be purchased/registered from an external domain provider (not from Systeme.io).
- A Systeme.io account – Make sure you’re logged in and have access to your account settings.
Important Notes:
- A domain name can only work for one website at a time. If your domain is already connected to another website, it won’t be available to use on Systeme.io until you disconnect it from the other site.
- This guide is specifically for integrating a root domain (example `www.domain.com`). If you prefer to use a subdomain (e.g., `shop.domain.com`), you’ll need to follow a different guide.
Step 1: Add Your Domain to Systeme.io
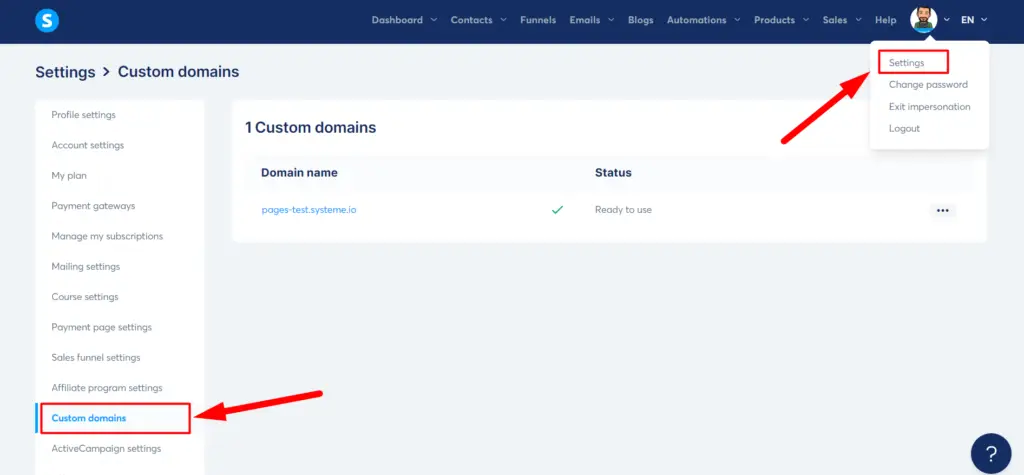
Step one ensures that your domain is linked to your Systeme.io account. Follow these instructions:
- Log in to Systeme.io and click on your profile picture located in the top-right corner.
- From the dropdown menu, select Settings.
- Inside the settings page, click on Custom Domains.

Click Add Domain and enter your domain name. Be sure to include “www” at the front. Example: `www.domain.com`.

After entering your domain, a popup will appear showing two CNAME records. These are unique codes that you’ll need to add to your domain provider’s DNS settings.
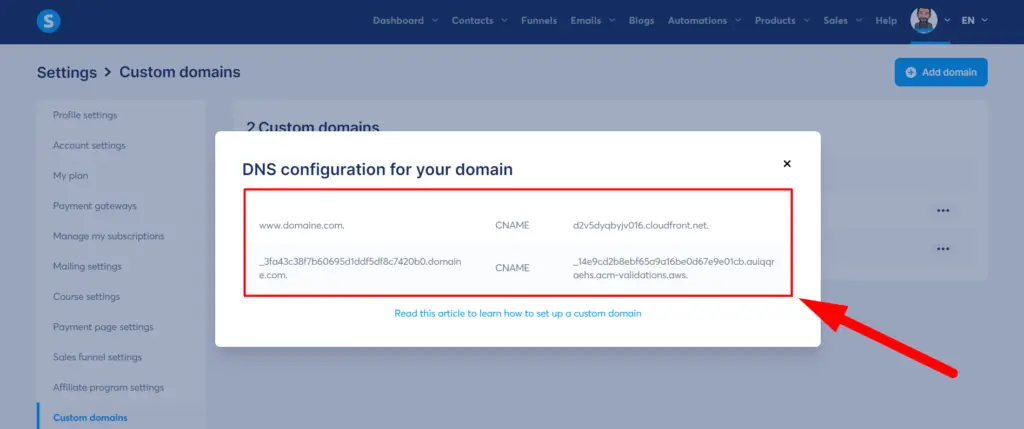
What is a CNAME Record?
A CNAME record, or Canonical Name record, is part of your domain’s DNS (Domain Name System) settings. Simply put, it tells the internet where your domain should send visitors. Instead of pointing directly to an IP address, a CNAME maps your domain or subdomain to another domain name, which then resolves to the correct IP address.
For example, if you host your website on Systeme.io, a CNAME record can direct traffic from your custom domain to your Systeme.io site. This ensures that when someone types your custom domain, they’re seamlessly redirected to the right destination without needing to understand the technical details.
Setting up a CNAME record might seem tricky, but it’s a straightforward process. It typically involves logging into your domain registrar’s dashboard, navigating to DNS settings, and creating or editing a CNAME record using details from your hosting service. This setup enhances your online presence with a custom domain and ensures smooth redirection for visitors.
Understanding CNAME records is helpful for managing your domain or fixing redirection issues. It’s a small yet essential step in making your website professional and efficient.
Step 2: Add CNAME Records to Your Domain Provider’s DNS Settings
At this point, you’ll need to sign in to the account where your domain is hosted (e.g., GoDaddy, Namecheap, OVH, etc.) and update the DNS records. Here’s what to do:
- Log into your domain registrar’s account.
- Access the DNS zone settings for your domain. This area is where you manage all records associated with your domain.
- Add the two CNAME records provided by Systeme.io.
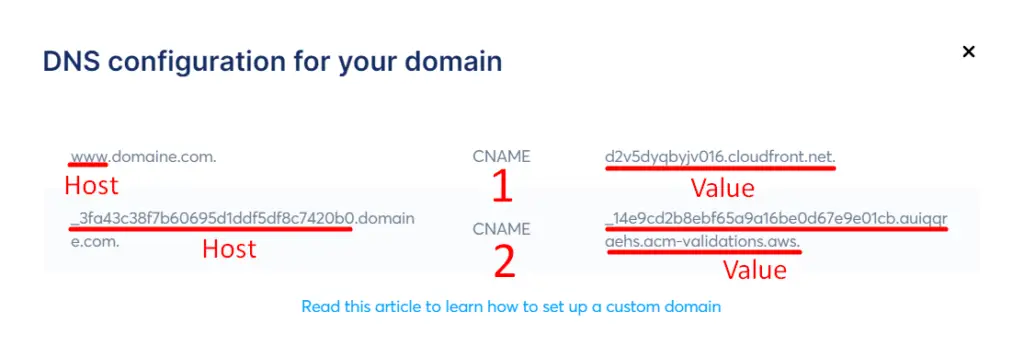
First CNAME :
- Name (Host) : www
- Target (Value) : d2v5dyqbyjv016.cloudfront.net.
Second CNAME :
- Name (Host) : _3fa43c38f7b60695d1ddf5df8c7420b0
- Target (Value) : _14e9cd2b8ebf65a9a16be0d67e9e01cb.auiqqraehs.acm-validations.aws.
(The CNAME records above are examples; you must add your own values).
Here is an image of the elements you need to add to your DNS zone:
2.3 Once the two CNAMEs are added to your host, you can check your DNS RECORDS to confirm changes using this website:
They should all be verified like the example below. If not, the records were not entered correctly. You need to edit your DNS.

Note 4: It can be up to 24-48 hours before the DNS records are fully propagated.
Note 5: Sometimes your provider may not be able to register your CNAMEs due to a conflict with another DNS. This usually happens when the first CNAME is added.
At this time, you need to contact your host to find out the importance of these DNS and to give you permission to remove them.
Once you have completed this second step, you need to move on to the redirection of your domain name.
Step 3: Redirection
The process for this step varies depending on your hosting service provider:
- If you’re using Namecheap or Cloudflare, proceed to Step 3.1.
- For all other DNS hosting providers, skip to Step 3.2.
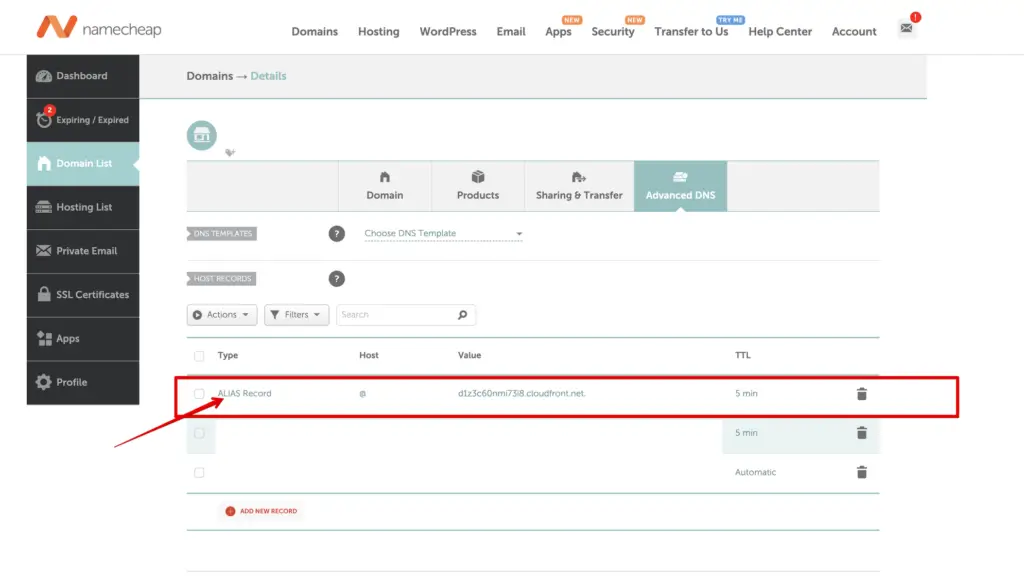
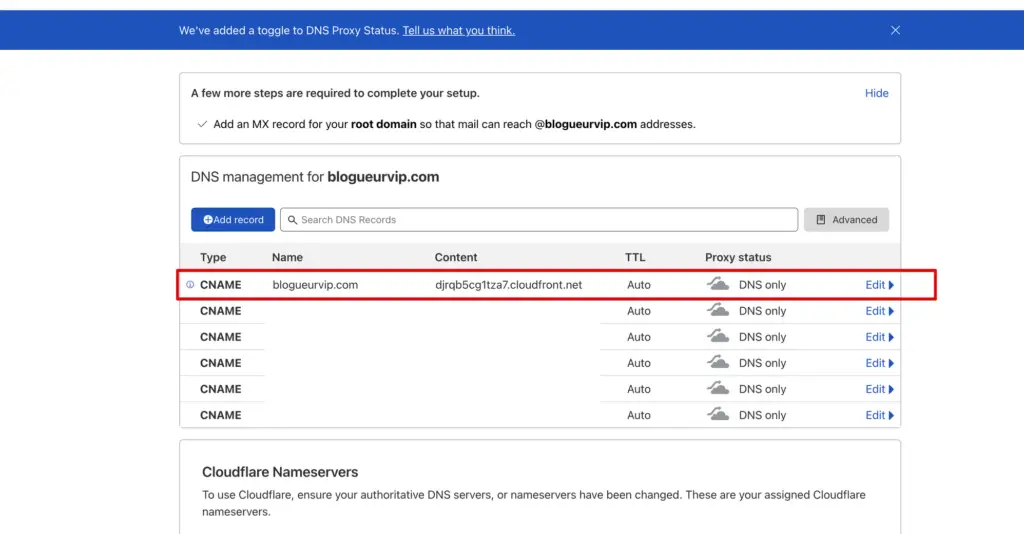
Step 3.1: Creating a CNAME Record for Root Domain (Namecheap or Cloudflare)
For those using Namecheap or Cloudflare as their hosting providers, you’ll need to create a CNAME record for the root domain. Point it to the same destination as your “www” CNAME record. This ensures proper redirection and functionality.
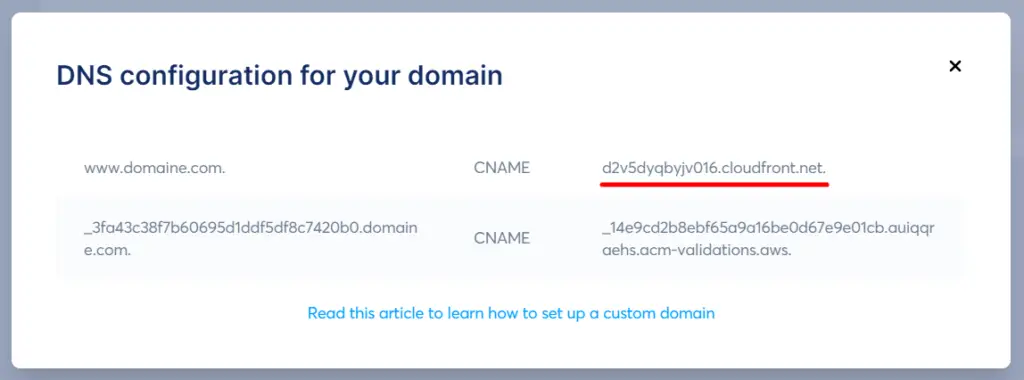
Examples with Namecheap hosting service provider:
Examples with Cloudflare hosting service provider:
Step 3.2: Set Up a Redirection (for Other DNS Hosting Providers)
To set up a redirection with your domain host, follow these steps:
- Navigate to the “Redirection/Forwarding” section.
- Select “Add Redirection”.
- Configure the redirection from domain.com to www.domain.com.
Important Notes:
- Domain approval may take a few hours to complete.
- DNS record propagation can take anywhere from 24 to 48 hours.
- Redirections typically work with HTTP or when the protocol is not specified in the URL. However, they will work with an explicitly defined https:// in the URL. This limitation is due to restrictions from DNS hosting providers.
If HTTPS redirection is essential for your setup, consider migrating your domain to Cloudflare for more robust support.


